START
Using
This Quick Start Manual
Use this Quick Start Manual to get your INFT Temperature Indicator when
used with a termocouple up and running right out of the box. To do this
you:
Connect the power cord
Connect the RTD
Configure the unit
- specify thermocouple type
- set degrees to C or F
- set decimal point position
Before
You Begin
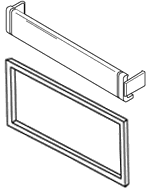
You should have the following parts:
INFT unit
Front-panel button cover
Panel-mounting gaskets
Rear protective cover (attached) with green Cold Junction Compensation
Board (right side, top to bottom).
|
|
|
|
You
MUST have this component (on right). Contact the Newport
Customer Service Department at (714) 540-4914 if any of these parts
are missing, or if you have questions. |
In addition to
the unit and related parts, you will need the following items to set up
your unit:
110V ac power
Thermocouple
1/8" flat blade screwdriver
1/8" Phillips head screwdriver
Connect
AC Power
1.
Remove the rear protective cover and set it aside. The cover is
secured with a single Phillips-head screw.
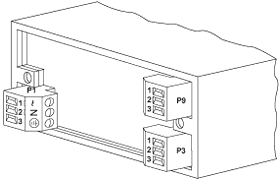
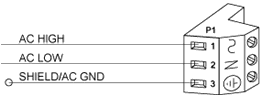
2. Locate connector P1 on the bottom-left rear of the INFT
unit. The connector has three screw-down terminals: (see Image on
right)
3. Insert the correct wire in each terminal and tighten the
lockdown screw. Tug gently on the wires to verify the connections.
 Take care not to damage the green Cold Junction Compensation
board and its connectors.
Take care not to damage the green Cold Junction Compensation
board and its connectors. |
|
4.
Replace the rear cover. Verify proper seating of the connectors
on the green Cold Junction Compensation board.
5. Thread the power wires through the slots on the side of
the cover. Replace the rear cover retaining screw. |
Connect
the Thermocouple
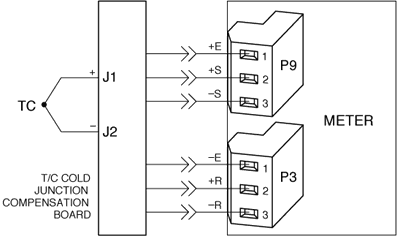 Regardless
of thermocouple type, the RED wire is always NEGATIVE. Regardless
of thermocouple type, the RED wire is always NEGATIVE.
The cover on the thermocouple connector shows the positive and negative
terminals.
1. Attach the wires and tighten the retaining screws. Tug gently
on each wire to verify the connection.
2. Apply AC power. The front panel of the unit displays RESET2,
followed by the temperature. If it does not:
a. Remove ac power.
b. Verify your P1 power connections.
c. Check your power source.
d. Plug the unit in again.
If the unit flashes + OPEN, the Cold Junction Compensation Board
is not seated properly. Check the connections and the rear cover retaining
screw, and repeat this step.
Configure
the Unit
Press the front panel buttons
|
Press
Button
|
To:
|
|
Press
Button
|
To:
|
|
|
access the configuration menus and move from one menu to the next.
|
|
|
change
the value of a submenu. |
|
|
enter and scroll through a submenu. |
|
|
move
backward one menu (press once) or exit the configuration menus (press
twice). |
|